Tuesday, December 7, 2010

ABC- Maple Pecan Medjool Date Rugelach


This was my first month baking with Avid Bakers Challenge- it was a nice change! Rugelach is something I'm pretty sure I'd pass up on. Something that wasn't in my a eye's frame, you know- chocolate, caramel, cream cheese. I'm glad that I went ahead and ran with these! I didn't use whole dates and wrap them, I chose to chop up my dates, and blend with the sugar nut mixture. I was out of real maple syrup and only had sugar free in the house (something that I know wouldn't do justice) so I subbed in dark corn syrup. I like what this did- gave it a 'warm' flavor. The dough was a light buttery cream cheese flavor with a flakyness that rocked. All in all, a win here. Be sure to check out (and join) The Avid Bakers Challenge for other posts on this fantastic little treat!

Friday, December 3, 2010

Winner Announced! $35 CSN Gift Card Giveaway!


So, just in time for the holidays!

Congrats to:
Cheryl!


I'll be sending along your info to CSN reps for your win!

Happy Holidays! I'm feeling another giveaway soon!

Wednesday, December 1, 2010

'Toy Story' Birthday Cake


My oldest (gasp!) son's birthday was November 29th. My little big man has turned four. Going on forty. As usual, I decided to make his birthday cake.

I really try to do that with both the boys, my youngest Nick-kinda got shafted this year. We were in the middle of a move, and I just didn't make him a a cake. He didn't party either (well, we had a little one at my Aunts house with my husband on the webcam) I seem to feel like my little man gets the shaft. I'm going to make a BIG effort to give him at least a rocking cake next year! At 3, I don't know how many other friends he'll have since I'm a SAHM and he won't be starting a sport until after his birthday. (Soccer!- It's adorable when the really little ones play!)

On to the cake. Jackson and Nicholas are HUGE Toy Story fans. I don't know a kid that hasn't been captivated by those movies. I gotta admit they are adorable. I like them too, just like I really like the Shrek movies (by the way, you can pre-order on amazon for $40 for the set of blu-rays!-Christmas present here!) There I go off the topic again.

I made a white wedding cake- moist, slightly dense, solid flavor. With an Oreo creme filling. The filling rocked my world. I was eating it alone. With a spoon. In the basement. It was so good. The top was a butter yellow cake with a chocolate whipped ganache. 8" and 6" respectively. In my dense mind I forgot that I needed 4" cakes (in height- exactly) for my usual stacking system (it's what happens when you haven't made a cake in almost 6 months). So I had beautiful tall layers- which I love, but that required me to go back to the straw stacking system. Since we didn't have to travel. That worked. Both are covered in a buttercream flavored fondant. (fondx) I have made my own fondant- and I like it, but I had this bucket from a while ago and I needed to use it. And I didn't want the extra mess.

The rest of the decor is fondant. With the exception of the silver stars. Those are gumpaste. I free handed the clouds on paper and traced onto the fondant (if you can't tell- they're not quite right) same with the cow "spots". The red pearl border is a first impressions mold that I've recently decided I love. And the rope border was made with a clay extruder (found at local craft stores in the clay section- only used with food though).

Needless to say. He loved the cake. Even without it saying "Toy Story" on it- he knew right away what it was! I had contemplated adding a Buzz and Woody on the top (plastic figurines) but I decided against at the last minute, going for the set-up you see.

If there's any questions you might have, I'd LOVE to try and answer them! But I gotta say Cake Central is a huge part of getting me started in cakes!


Oh- and it's snowing here. Christmas is coming!!

Tuesday, November 23, 2010

Pumpkin Cream Cheese Muffins- and -my FIRST GIVEAWAY!


These are so fantastically awesome, I'm considering buying a case of pumpkin to keep around all year, just for these muffins. I found these on Annie's Eats. She has some really awesome recipes on there, and I often check her site to see what other rockin things she's posted! Fall is here, Thanksgiving is Thursday, it's high time that I broke out the pumpkin. These are so delicious! The ONLY thing I change next time would be to add some finely chopped toasted pecans to the sugar mixture on top. But I just love pecans. A minor plan a head is the cream cheese mixture- I made that the night before and put it in my freezer, got up the next morning and made the muffin batter. Worked wonderfully!


That being said- Muffins are Awesome, Giveaways rock!


CSN has offered me a $35 gift card to one of my most awesome readers!! I LOVE CSN, you can get just about anything there! CSN is comprised of over 200 online stores, where you can find everything from a counter stool for your kitchen to a baby crib or a new pair of shoes! Seriously! The first time I visited I was SHOCKED at the amount of items they carry! Talk about one stop shopping!

* CSN ships to US and Canada only.


To Enter this Giveaway You'll Need to Do This: (leave a comment for each of entry)
1. Follow Me! (via Google on right)
2. Leave a comment on this post.

3. Post about this giveaway on Facebook, link back to this post.

Giveaway ends December 1st @ midnight EST. A winner will be randomly selected and I'll contact you via email.


Pumpkin Cream Cheese Muffins Printable
VIA: Annie’s Eats

Ingredients:
For the filling:
8 oz. cream cheese, softened
1 cup confectioners' sugar

For the muffins:
3 cups all-purpose flour
1 tsp. ground cinnamon
1 tsp. ground nutmeg
1 tsp. ground cloves
1 tbsp. plus 1 tsp. pumpkin pie spice
1 tsp. salt
1 tsp. baking soda
4 large eggs
2 cups sugar
2 cups pumpkin puree
1¼ cups vegetable oil

For the topping:
½ cup sugar
5 tbsp. flour
1½ tsp. ground cinnamon
4 tbsp. cold unsalted butter, cut into pieces

Directions:
To prepare the filling, combine the cream cheese and confectioners' sugar in a medium bowl and mix well until blended and smooth. Transfer the mixture to a piece of plastic wrap and shape into a log about 1½-inches in diameter. Smooth the plastic wrap tightly around the log. Place into the freezer and chill until at least slightly firm, at least 2 hours, over overnight. It’ll be fine.

To make the muffins, preheat the oven to 350˚ F. Line muffin pans with paper liners. In a medium bowl, combine the flour, cinnamon, nutmeg, cloves, pumpkin pie spice, salt and baking soda; whisk to blend. In the bowl of an electric mixer combine the eggs, sugar, pumpkin puree and oil. Mix on medium-low speed until blended. With the mixer on low speed, add in the dry ingredients, mixing just until incorporated.

To make the topping, combine the sugar, flour and cinnamon in a small bowl; whisk to blend. Add in the butter pieces and cut into the dry ingredients with a pastry blender or two forks until the mixture is coarse and crumbly. Transfer to the refrigerator until ready to use. *Next time I’d add finely chopped toasted pecans to this mixture for some extra oomph.

To assemble the muffins, fill each muffin well with a small amount of batter, just enough to cover the bottom of the liner (1-2 tablespoons). Slice the log of cream cheese filling into 24 equal pieces. Place a slice of the cream cheese mixture into each muffin well. Divide the remaining batter among the muffin cups, placing on top of the cream cheese to cover completely. Sprinkle a small amount of the topping mixture over each of the muffin wells.

Bake for 20-25 minutes. Transfer to a wire rack and let cool completely before serving. (It may be hard to resist immediate consumption, but the cream cheese filling gets very hot!)

Store in an airtight container. Makes 2dzn.

Thursday, November 18, 2010

Caramel Cream Coffee Treat


So this really is more along the lines of an anytime treat vs just a 'coffee treat'. Cause really, for as simple and delicious as these are, you'll want to make them an anytime treat and not restrict them to just coffee time. Or if you're like me and found a new love for coffee. Then you find yourself drinking coffee 3-4 times a day. It's iced. It's delicious. I make them at home, so it's not killing my pocket book. Then every few hours is coffee time and you can eat these then. Until you realized that you've eaten 6 of them and your pants all of a sudden feel tight, and you wonder where you found the energy to scrub the kitchen floor with a toothbrush. Sugar, caffeine high. Glorious.

That was flighty. On to the recipe.

Caramel Cream Coffee Treat printable
(adapted from Pillsbury Best Bake-Off 1996)

Ingredients:
1 c firmly packed dark brown sugar
½ c chopped pecans
⅓ c dark corn syrup
¼ c melted butter

2 8oz pkg cream cheese, softened
½ c powdered sugar
2 T butter, softened
3/4c coconut

2 lg cans of Grands (or similar) flaky biscuits

Directions:
Oven to 350. Parchment lined 9x13.
In a bowl combine brown sugar, pecans, corn syrup and melted butter. Spread on the bottom of a 9x13 parchment lined pan evenly.
In a small bowl combine cream cheese, powdered sugar, and butter until smooth; stir in coconut.
Separate the dough in to 16 biscuits. Press or roll each until approx a 4” circle. Spoon a heaping tablespoon of the cream cheese mix in the center of each one and spread within a ¼” of the edges. Roll up length wise. You want a nice amount of the cream cheese mixture in the center of each. Place SEAM SIDE DOWN on the brown sugar mixture in the 9x13. Continue until filled and you’re out of biscuits. It’ll be a tight fit.
Bake at 350 for 25 to 30 minutes or until a deep golden brown. Cool 3-5 minutes and invert onto your serving platter. It’ll be gooey and delicious. Careful, it’s hot. I really liked these cooled as well.

Tuesday, November 16, 2010

Black, White and Peanut Butter Brownies


These started with a box. My husband was so shocked when I told him. I told him not to tell anyone at work. ;) I've been to the library because it's been cold out- and I voted to add funding- I'd better use it. Anyway that led me to the cookbook section. I walked away with no less than 9 cookbooks to rummage through. I got this (and the next one I'm posting) out of an old Pillsbury Bake Off cookbook. I really love those type of books. They're often created from home chefs who know what works ... I like to think those books are like blogs are today. On to the recipe.

Black, White and Peanut Butter Brownies Printable
adapted from Pillsbury Best of the Bake off Cookbook 1996

Ingredients:
Brownies:
1 (9x13size) fudge brownie mix
1/4 c water
1/2 c oil
2 eggs
1/2 c chopped pecans
1c semi sweet chocolate chips
1c white vanilla chips
1 c of peanut butter chips or candy coat

Frosting:
2 c powdered sugar
1/4 c unsweetened cocoa powder
4 T hot water
1/4 c butter, melted
1 t vanilla
1/2 c chopped toasted pecans
Directions:
Oven to 350.
Pam or parchment a 9x13. In a large bowl combine brownie mix, water, oil and eggs. Don’t over mix- approx 50 strokes. Add in 1/2 c chopped pecans, chocolate chips and vanilla chips. DON’T add the peanut butter candy coat yet. Spread in pan.

Bake at 350 for 28-35 minutes or until center is set. Remove from oven. Melt peanut butter candy coat until smooth and spread over the top of the brownies. While that cools mix the frosting.

In a small bowl, combine all frosting ingredients except the pecans and beat until smooth- it’ll be thin. Pour that over top of the cooled peanut butter layer, spread to cover. Chill an hour and 1/2 or until completely cooled.

Sunday, November 14, 2010

Winner Winner Chicken Dinner!

So, I randomly enter contests. Cause, ya never know what you might win right!? I've occasionally won some really cool stuff,(shake and bake with a gift card!) and some stuff that makes you go 'huh'. But it's all equally exciting!

However- my cool win of the month (a $50 CSN gift card) from Beyond Kimchee! You must check her out. Her photos are awesome, and a delight to read.

I just put 'delight'. I might as well put 'super dooper'.


I've never shopped @ CSN, but I've heard good things! I'm pretty excited for it!

On a cooking note: I've got some brownies cooling and my MOST AWESOME husband is working on my DIY Lowel lights. I'm hoping for some cool shots soon!

Thanks again Holly! :)

Friday, November 12, 2010

Mini Mint Brownies


My kids and I were deciding what to do that day. I was plowing through recipes trying to figure out what would be easy enough for my two little helpers. Came across these from Our Best Bites . Some seriously adorable stuff on that website. Anywho- we got to making them- Jackson (my oldest @ almost 4) was a super helper putting all the little liners in the mini muffin cups. While Nicholas was awesome at stirring up the chocolate that we melted. They came out pretty darn tasty! My boys quickly devoured the ones that they stuck their fingers in (can't send those to work with Daddy! ) they were a hit here. I think that these are pretty adaptable. I can see peanut butter frosting with dark chocolate drizzle, red PEPPERMINT frosting with a dark chocolate drizzle and crushed candy canes on top. Almost endless possibilities!

Mini Mint Brownies
printable
adapted via Our Best Bites
Ingredients:

Brownies:
4 squares unsweetened baking chocolate (4oz)
1 C butter (2 sticks)
4 eggs
2 cups sugar
1 tsp vanilla
1 1/4 C flour
1/2 tsp baking powder
1/2 c mini semi sweet chocolate chips

Frosting:
3 1/2 C powdered sugar (give or take for your consistency)
4 T butter, softened
4 T shortening
1/4 t mint extract ( I would up this to 3/4 t next time)
1-2 Tbs milk (give or take for your consistency)
green food coloring

Chocolate Glaze:
6 oz (about 1 cup) Nestle dark and mint chips -limited edition!
1 Tbs shortening

Directions:
Preheat oven to 350 degrees. Line a mini muffin pan with mini muffins liners or- go all natural. (In my opinion I prefer the liners- I think they help keep fresh if not serving same day)

Chop both unsweetened chocolate and two sticks of butter into chunks and place together in a microwave safe bowl. Microwave in 30 second intervals, stirring in between, until just melted and smooth. Set aside to cool, stirring occasionally.


With an electric mixer or stand mixer beat eggs, sugar, and vanilla for 2 minutes. While egg mixture is beating, measure out flour and combine with baking powder. While mixer is running, slowly add melted chocolate and beat to combine. Turn beater speed to low and add in flour by spoonfuls. Mix just until combined. Pour batter into prepared mini muffins and bake for 12-16 minutes or until a toothpick poked in center comes out clean.


Cool completely on a metal rack. When brownies have cooled to room temperature, prepare frosting. Combine all frosting ingredients, starting with 1 1/2 tablespoon of milk, and beat until light and fluffy. Add more milk by teaspoonful as needed. Add frosting to the mini brownie bites as you’d like. A large star tip is will work fine-or a cute little swirl with the back of a knife is adorable too.


While brownies are chilling prepare chocolate glaze. Place chocolate chips and 1 tablespoon of shortening in a microwave safe bowl. Microwave in 30 second intervals, stirring in between, until just melted and smooth. Take a fork and drizzle across the icing. And you will enjoy minty goodness.

Makes 50 mini brownies.

Tuesday, November 9, 2010

Chocolate Pound Cake - sorta


I have a few blogs (okay many) that I find myself navigation towards. Eliana of A Chica Bakes (not really a blog but a full .com operation) is one of them. I find myself getting absorbed in her posts and forget that I was there to check out a new recipe. She is one of a few that I know has checked out my blog on more than one occasion - and she's super sweet with her comments. Which all of us bloggers know is really what tickles our fancies. While I have several of her recipes bookmarked to try- this Chocolate Velvet Pound Cake of hers has been on there for a while. Now, I must admit. I goofed it up. Let's keep it real- not everything that comes out of our kitchens are photo perfect. Even when I'm lucky enough to catch what I think is a picture perfect photo- I snap back into mediocrity at it's finest. But I keep trying. It's what I need to do. I bake for myself, my family, my blog and my husband's coworkers. And I also bake for my gym membership. Sigh. That went off into left field and I'm not editing it. It's what you get.

So I baked this beautiful loaf. And it smelled nice. But I failed. Here's a few things that went wrong. 1. I sprayed my pan with Pam. Plain old Pam. I hardly ever do this. I usually Baker's Joy it at minimum. 2. I used a loaf pan that I think was too big- like a 9x whatever vs an 8. I think that lead me not to have that really pretty crown on top as well. 3. Most importantly because of 1 (and some of 2) my loaf broke. The bottom stuck so bad the the pan- when I tried to scrape it out, I pulled up some of the finish. I just tossed the pan. I'm lazy like that.

So I'm left with 2/3 of a tasty yet, ugly loaf. It left me wanting 2 things. 1. The ability of getting it right the first time. And 2. those adorable mini trifle cups- ya know what I'm talking about- these. I've seen them everywhere lately and I will have them soon. My son's 4th birthday is the end of this month- is it wrong to get me a present too? (don't answer that- he won't go without!)

So I used my regular custard cups- or they might be mini prep bowls. They're versatile in any case. I whipped up a box of french vanilla pudding and layered it with this yummy pound cake. Dessert tonight.

Thanks Eliana for the recipe! I'll make it again when I have all my wits about me.


Chocolate Velvet Pound Cake
printable
Adapted from: A Chica Bakes (via The Art and Soul of Baking)

Ingredients:
1 1/2 sticks (6 ounces) unsalted butter, at room temperature
1 1/4 cup (8 3/4 ounces) sugar
1 teaspoon water, at room temperature
2 teaspoons instant espresso powder
3 large eggs, at room temperature
1 teaspoon vanilla
1 cup (5 ounces) all purpose flour
1/2 cup (2 ounces) unsweetened Dutch-process cocoa powder
1/4 teaspoon baking powder
Pinch of Salt
1/2 cup (4 ounces) buttermilk, at room temperature
3/4 cup semi-sweet mini chocolate chips

Directions:
Preheat the oven to 350 degrees. Coat a loaf pan with butter, generously.
Beat the butter and sugar in the bowl of an electric mixer until light, fluffy and almost white in color - roughly 6-7 minutes. Scrape down the bowl with a spatula. In a small bowl, combine water and espresso powder until smooth. Crack the eggs into the same bowl and mix to blend. Add vanilla. At medium speed, add the egg mixture to the butter mixture about 1/4 cup at a time. Allow each addition to completely blend before adding the next and make sure to scrape down the bowl after each addition.
Combine the flour, cocoa powder, baking powder and salt into a medium bowl and lightly whisk to combine. With the mixer on its slowest speed, add the flour mixture and buttermilk alternately, beginning and ending with the flour mixture. Mix until just incorporated finishing with a rubber spatula by hand. Add the mini chocolate chips and fold just until mixed in.
Scrape the batter onto the prepared pan and bake for 45 to 55 minutes - until firm to the touch and a toothpick inserted into the center of the cake comes out clean. Cool completely over a rack before slicing and serving.

Friday, November 5, 2010

Chocolate Chip Banana Muffins with Pecans

I was in a little funk. Simply overwhelmed by what I wanted to make. Then I spotted these. They gave me what I was looking for. Deliciousness. They were simple to put together, and had that good MUFFIN texture. Not the cupcake delicate crumb. These babies gave me a moist, hearty crumb that was a nice mix of flavor. Not an overload on any one thing. I would usually bake these in liners- but opted to go all natural. I almost wish I hadn't sent them to work with my husband this morning. I kinda miss them.


Chocolate Chip Banana Muffins with Pecans:
printable
adapted slightly via For the Love of Cooking

Ingredients:
* 1/2 cup of butter, softened
* 1 cup firmly packed brown sugar
* 2 large eggs (or 3 medium eggs)
* 1 cup mashed ripe bananas (2 large)
* 1 tsp cinnamon
* 1/4 cup buttermilk
* 1 tsp vanilla extract
* 2 1/4 cups of flour
* 3/4 tsp baking soda
* 1/2 tsp baking powder
* 1/2 tsp salt
*1/2 cup mini semisweet chocolate chips
* 1/2 cup toasted pecans, chopped

Directions:
Preheat the oven to 350 degrees and coat a muffin tray with cooking spray.

Beat the butter at medium speed with a mixer until creamy. Slowly add the brown sugar, beating until light and fluffy. Add the eggs, one at a time, beating just until blended after each one.

In a separate bowl, stir together the mashed bananas, cinnamon, buttermilk, and vanilla. Mix the flour, baking soda, baking powder, and salt in another bowl; add to the butter mixture alternately with the banana mixture, beginning and ending with the flour mixture. Beat on low speed just until blended after each addition. Do not over-beat. Spoon the batter into the prepared muffin tray, filling two thirds full. Sprinkle the pecans over each muffin evenly.

Bake for 20-25 minutes or until a tester inserted in the middle of a muffin comes out clean. Remove from pans immediately, and cool on wire racks.

Makes 1 dozen. Store tightly in an airtight container for best freshness!

Tuesday, November 2, 2010

I'm having a hard time.

So I'm sitting here, blowing through my list of recipes I haven't made yet. And I'm overwhelmed! I'm slightly leaning towards something banana. Just because I have some bananas in the cabinet that are starting to turn. But then that brings me to: banana muffins, banana bread, banana cupcakes. Or- I can flip to something that has nothing to do with bananas- those can be frozen. So then that leads me to the new bag of milk chocolate/peanut butter chips I got the other day. Or the toffee bits that are sitting up in the cabinet.

So, if anyone has heard of anything that sounds amazing. Drop me by a line! I'm stuck.

Friday, October 29, 2010

Halloween Sugar Cookies


So these cookies had help. My Mom loves Halloween as much (if not -gasp- more) than I do! I told her about maybe some sort of drawing on the cookies (I was then thinking of royal icing) wishing I had better drawing skills than some rocking stick figures. (ha) Luckily I came across this book. (amazing when you google how to draw Halloween) It's pretty much the 'how to' draw for dummies. I need that. Then I remembered Bakerella and Americolor's Gourmet Food Writer Pens! HELLO! The next day my Mom sent me a "Happy Halloween" package. I'm 26 and my Mom still spoils me.

These cookies have the cakey, creamy texture that almost melts in your mouth. Pair it with your favorite cookie icing (I've grown farther away from Royal icing the more cookie icing I make) and you've got a great cookie that tastes like it was way more effort.

No Fail Sugar Cookies
printable
via a blog post on Wilton Forums

These do no ‘poof’ up much at all. This recipe is great to use for very detailed cookies. They can also be frozen (well wrapped) for up to 2 months. Unfrozen and packaged they will keep up to 3 weeks.

Ingredients:
2 sticks of SALTED butter (the better the brand the better the cookie here)
1 lg egg
1c sugar
1 1/2 t vanilla
2 3/4c- 3 cups flour

Directions:
Oven to 400. NOT A TYPO. 400.
Cream the butter and sugar together. Add egg and vanilla and mix until combined. Add in flour mixing until the dough forms. The dough should NOT be crumbly. And there’s no need to chill it.

Flour your countertop and flour your roller. Work with 1/3 of the dough at a time so you don’t over flour any dough.

These are best nice and thick a decent 1/4”.

Place on parchment lined cookie sheets (better if without edges so that they all cook evenly)

Bake for 7-8 minutes. These give ‘just barely’ done cookies. That’s how I like em. If you want a crunchy sugar cookie- this isn’t for you.

Cool on cookie rack. Decorate with your favorite icing.

*if you’re feeling a bit on the wild side- swipe out vanilla for almond, or orange, or lemon. I’ve done it all and it’s a nice change!

Have a SAFE and HAPPY Halloween!

Kathy of polwig.com had a genius idea before me! If I had seen those before I did mine, I probably would have done some cool aged look to the cookies- adorable! Be sure to check those out too!

Wednesday, October 27, 2010

Graveyard Cupcakes (Devils Food with Flour Frosting)


Yeah for Halloween! My husband brought these to his job the day after I made them and they were all gone before lunch! He stopped in the middle of his day to let me know that he'd received a slew of compliments on them! That definitively made my day! I used (2) new recipes for these cupcakes and I'm glad I did! The Devils Food is by far THE best chocolate cupcake I've ever made! And the flour frosting- blew me away. I thought I was taking a long shot making a flour based frosting (come one seriously!? flour!?) but I'm so glad I took the leap! It's so good! Not a super sweet frosting- this is light and while still sweet doesn't leave you on a sugar high. I really liked it for a nice change of pace. If I did these particular cupcakes over again (and why not?! they rocked) I would add a layer of frosting to the bottom before piping with the grass effect. I would have preferred more frosting.
(I'm having some fun with photo editing..can ya tell?! lol)

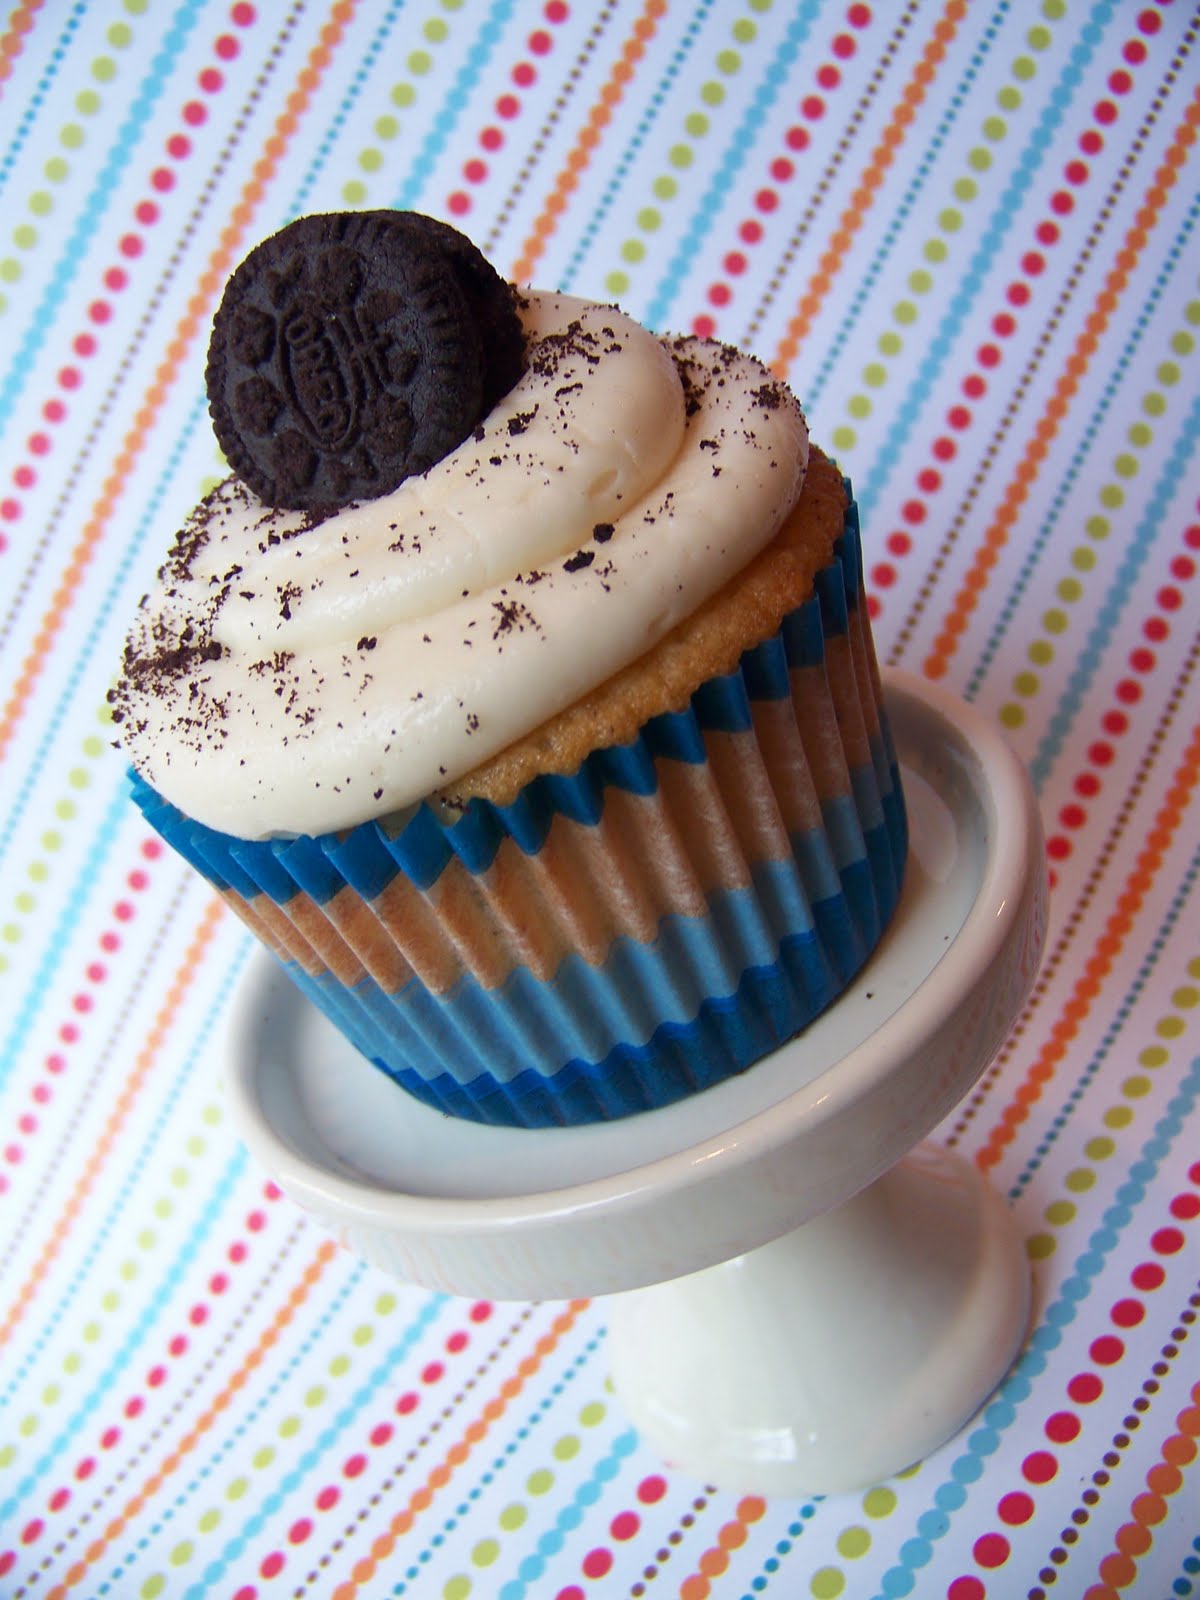
Devils Food Cupcakes
(seriously the best chocolate cupcake) printable
(adapted from: What the Fruitcake?)

Ingredients:
3/4 cup Strong Hot Coffee (brewed or instant)
3/4 cup cocoa
12 Tablespoons (stick and 1/2) Unsalted Butter, room temperature
2 cups packed brown sugar
3 eggs
2 1/2 cup flour
1 tsp baking soda
1 tsp baking powder
1 tsp salt
1 cup buttermilk**
1 tsp vanilla

**If you’re out of buttermilk or don’t always keep it on hand you can use 1T lemon juice or 1T white vinegar to make it. Add your 1T of lemon juice or vinegar to bottom of a 1c liquid measuring cup and add enough milk to make 1c. If you’re making buttermilk- do this first so that it has time to set.

Directions:
Oven to 350. Line (2) muffin tins with liners and set aside.

Make your coffee. I used a packet and 1/2 of instant to 3/4c of hot water and blended. Mix in your cocoa into the hot coffee until smooth. Cover with plastic wrap and set aside.

Sift your baking powder, baking soda, salt and flour together. Set aside.

Mix buttermilk and vanilla- also set aside.

Cream your butter and brown sugar together in your mixer until nice and combined. Ya know creamy like.

Add eggs one at a time, mixing after each just until they’re incorporated. Don’t forget to scrape down the bowl.

Now add your flour and milk mixture. Alternating in 3 parts. Starting with and ending with flour. Mixing just until combined each time. It’ll go like this: 1/3 of flour, mix. 1/2 of milk, mix. 1/3 of flour,mix. Other 1/2 of milk, mix. Rest of flour, mix. (mixing each time just until combined and often scraping down bowl)

Now add in your coffee/cocoa mixture. It’ll look a bit weird. But mix until combined. I found it best to start with my mixer mixing, but to finish by hand making sure I really scraped the bowl to get it all in.

Now- equally divide the mixture into your prepared lined muffin tins. I use a handy dandy ice cream scoop and level it off each time.

Bake in oven for 20-22 minutes until a toothpick in center comes out clean. They’re very beautiful aren’t they?

Cool in pan for 5-10 minutes before removing them to continue cooling on a wire rack.


Flour Frosting
(no judging until you try this and are convinced) printable
(via The Pioneer Woman)

Ingredients:
5 Tablespoons Flour
1 cup Milk
1 teaspoon Vanilla
1 cup Butter
1 cup Granulated Sugar (not Powdered Sugar!)

Trust me on this okay!?

Directions:
In a small saucepan or skillet ( I use skillet so it heats faster and I feel like I can whisk more to ensure the flour is broken up), whisk flour into milk and heat, stirring constantly, until it thickens.

You want it to be very thick, thicker than cake mix, more like a brownie mix. Pay attention to this! It’s very true! Remove from heat and let it cool to room temperature.

It must be completely cool before you use it in the next step. Stir in vanilla.

While the mixture is cooling, cream the butter and sugar together until light and fluffy. REALLY beat it! You don’t want any sugar graininess left. Then add the completely cooled milk/flour/vanilla mixture and beat the living daylights out of it. If it looks separated, you haven’t beaten it enough! Beat it until it all combines and resembles whipped cream. I probably had this beating for 3-4 minutes. It’ll really start to look great!!

Notes:
This pipes fine. I wouldn’t use it to decorate a cake (as in, it does not crust). However I think it makes beautiful swirls for cupcakes (and I’m a fan of more is better of this frosting- so hard to stop tasting it!) And would be great for a dessert cake. I’m typing this and thinking of the next excuse I can use to make it.

It’s supposed to be best served the day it’s made. However, I refrigerated it (butter) and served it the next day after it came back to room temp and it was still just as good! I kept some in the fridge and you’ll want it to come to room temp before attempting anything with it. It does take color just fine!

Assembly:
I used double chocolate filled Milano Cookies and used Americolor Gourmet Food Writer to write on them- and inserted them into the back of the cupcake after frosting them. I added little bones to the crushed oreo dirt mound for oomph.
Happy Halloween!

Monday, October 25, 2010

Witches Brooms


HELLO HALLOWEEN!!


I love Halloween, it's passed down from my Mom and I can't help it. We decorate the outside up every year and we've gone as far as buying and "corpsing" up an anatomical skeleton 2 years ago. We named him Les. (after Guitarist Les Paul). We dress up, our kids dress up. I bake too much stuff, my husband's job enjoys the overflow. We all eat too much candy, then have some guilt attacks and take long fall walks. Life is good.

This week. Halloween Week.

Witches Brooms
printable
(Adapted from:Betty Crocker: Halloween)

Ingredients:
1 package of Peanut Butter Cookie Mix (betty crocker)
(and required ingredients on the cookie package- not terribly helpful, I know)

OR

Your favorite Peanut Butter Cookie Recipe

AND

package of pretzel rods (cut in 1/2- approx 24 total rods)
2/3 cup semisweet chocolate chips
1/2 teaspoon shortening
1/2 cup purple candy melts
OPTIONAL: sprinkles.

Directions:

Oven to 350.
Mix up your package cookie mix and roll into rough balls I used my cookie scoop- approx 1 1/4inch balls. Insert pretzel rod (the broken end) into the cookie dough and press into shape on a parchment lined cookie sheet. Repeat until you’ve used up your cookie dough/rods. Use forks to press into dough to give the broom bristles. Press deep.

Bake 12 minutes or until set and brown.

After baked and cooled. Melt your semi sweet chips and shortening together, stir until smooth. Spoon melted chocolate over brooms, leaving about an 1” at top of pretzel handle and bottom halves of cookie bristles uncovered.

Drizzle purple or orange or butterscotch chips (melted) over the chocolate and let set until chocolate is firm.

Sunday, October 24, 2010

Milk Chocolate Mini Bundt Cakes


I often get those days where I feel like I should be doing something- then I find I have no motivation to do anything.

Somehow, someway on a day like that I managed to get these beautiful babies done. Cracked open a cookbook- looked up chocolate (cause when this girl is in a funk- that's what's needed) and found that I had everything to complete this recipe. Praise be to the chocolate gods.


Milk Chocolate Mini Bundt Cakes
printable
(adapted from Baking: From My Home to Yours- Dorie Greenspan).

Ingredients:
For the Swirl:
3/4 cup chopped pecans
2 teaspoons unsweetened cocoa powder
2 teaspoons sugar
For the Cake:
1 cup flour
1/2 teaspoon baking powder
1/4 teaspoon salt
1 stick unsalted butter @ room temp
1/3 cup sugar
1 egg
1/2 teaspoon vanilla
1/2 cup whole milk
7 oz milk chocolate melted and cooled (good stuff)

For the Glaze:
2 oz bittersweet chocolate, finely chopped
2 teaspoons light corn syrup
2 Tablespoons butter
1 Tablespoon toasted pecans chopped (optional)

Directions:
Oven to 350. Butter generously (as everything to do with butter should always be generous) a 6 cup mini bundt pan.

For the Swirl:
Toss the nuts, cocoa, and sugar together in a small bowl. Set aside

For the Cake:
Whisk the flour, baking powder and salt. Set aside.
In your stand mixer beat butter and sugar together on medium speed until smooth, about 3 minutes. Scrape down the bowl and add the egg and beat for one minute more. Add the vanilla. It’ll look a bit curdled. Don’t stress. Reduce the mixer to low and add in 1/2 the flour mix, mix just until it’s incorporated. Add the milk and when it’s blended into the batter, add the rest of the flour. Mix again just until it’s incorporated. Then add the chocolate and mix to blend.
Fill each of the mini bundt molds with a little bit of batter- then sprinkle the swirl evenly between the 6 molds. Top off the molds with the rest of the batter.
Bake for 20-22 minutes or until a thin knife inserted into the middle comes out clean. Let rest for 5 minutes in the pan, then flip onto a cooling rack. Let stand to room temperature.

For the Glaze:
Melt chocolate chips, corn syrup and butter in a microwave safe bowl. Pour/drizzle over top. If you’re feeling a bit nutty (I usually am) add the toasted (toast please!) pecans and marvel at the gorgeousness of these pretty little desserts.

Friday, October 22, 2010

Easy Cheese Danish

On a whim I decided to roll through the 150+ recipes I have bookmarked and came across one where I magically had all the ingredients for.

That usually doesn't happen by the way. I'm almost always short an egg which I never realize until I'm adding them into the already wet batter, while my kids are down for nap.

Irregardless, after a quick run though the SHORT ingredient list- I had it all! I'm thrilled that I did. These babies had been on my radar for a while, and for some reason I always thought that I couldn't cut it. I mean - danish- sounds so fancy. I don't know if I can do fancy.

While they didn't turn as fancy as I'd have liked (I think next time I make them- and I'll make them again- my poor waistline) I'll fold them differently. All four corners together. I loved how the cheese filling oozed, and the puff pastry was so flaky. I wish I'd made them yesterday afternoon so my Husband could have taken them to work with him. I see them sitting on the counter over there. I already had one for breakfast.

I'll be venturing on to making them with different fillings...while I don't care for fruit ones, my Husband does, so I see an apple in the future (hello Fall!) and a pecan filled one. Anywho- if you find puff pastry on sale pick up a few extra boxes to store in the freezer and whip these babies up for super simple, showstopping occasions.

Easy Cheese Danish
printable
(adapted from Ina Garten)

Ingredients:
* 8 ounces cream cheese, at room temperature
* 1/3 cup sugar
* 2 large egg yolks, at room temperature
* 2 table­spoons ricotta cheese
* 1 tea­spoon pure vanilla extract
* 1/8 tea­spoon salt
* zest of one small lemon
* 2 sheets (1 box) frozen puff pas­try, defrosted
* 1 egg beaten with 1 table­spoon water, for egg wash

Direc­tions:
Pre­heat the oven to 400 degrees F. Line a sheet pan with parch­ment paper.

Place the cream cheese and sugar in the bowl of your mixer fit­ted with a pad­dle attach­ment and cream them together on low speed until smooth. With the mixer still on low, add the egg yolks, ricotta, vanilla, salt, and lemon zest and mix until just com­bined. Don’t whip!

Unfold 1 sheet of puff pas­try onto a lightly floured surface. Cut the sheet into quar­ters with a pizza cutter. Place a heap­ing table­spoon of cheese fill­ing into the mid­dle of each of the 4 squares. Brush the bor­der of each pas­try with egg wash and fold 2 oppo­site cor­ners to the cen­ter, brush­ing and over­lap­ping the cor­ners of each pas­try so they firmly stick together. Brush the top of the pas­tries with egg wash. Place the pas­tries on the pre­pared sheet pan. Repeat with the sec­ond sheet of puff pas­try and refrig­er­ate the filled Dan­ish for 15 minutes.

Bake the pas­tries for about 20 min­utes, rotat­ing the pan once dur­ing bak­ing, until puffed and brown. Best served warm.

These ARE super easy and the taste hits the spot!

Wednesday, October 20, 2010

No Bake Peanut Butter Treats

So this month for Taste and Create I was partnered up with Glenda from Busy-at-Home she has a very nice and organized recipe index that was a breeze to browse through (very unlike my index- I never tag- urgh)I'm big in desserts so I wet with something I thought I could toss together while the kids were attached to my legs.
This one did the trick! They both helped me beat down the graham crackers and we all shared in eating a treat when they were set!

This is super simple and can be adapted well. Think chunky peanut butter or nutella, it's possible they could become even better. As it is, I've been waiting for my husband to have a day where he's in the office so he can take them out of my fridge so I can stop nibbling. Sometimes I think this blog thing is detrimental to my diet. Long story short- these are good. Wait to make them until you can send them away!

No Bake Peanut Butter Treats
printable
(adapted from busy-at-home.com)

Ingredients:
* 1 cups butter, melted
* 1 1/2 cups peanut butter
* 1 1/2 cups graham cracker crumbs
* 1 lb. powdered sugar
* 2 cups semisweet chocolate chips
*2 Tablespoons dark chocolate chips

Directions:
Crush graham crackers into crumbs- get out some pent up frustration.(or buy crumbs if you’re feeling ‘zen’)

Melt butter in microwave safe bowl.

Add peanut butter, powdered sugar and graham cracker crumbs to butter and mix well. It will form a soft, moist dough. I used my Kitchen Aid for this - and it was a dream. If you feel like a work out - use a bowl and spoon.

Press the dough into a lightly greased 9x13 parchment lined pan (I LOVE parchment)

In another microwave safe container, melt the semi sweet chocolate chips in the microwave, stirring every 15 seconds until they are completely melted and spreadable.

Spread on top of the peanut butter mixture till smooth. Melt dark chunks in the similar fashion and drizzle on top of the semi sweet. IF you want pretty little bars- score the chocolate now, for easy, no breakage cutting later.

OR (what I would have done if I were thinking clearly about it) use candy molds or mini silicone cupcake molds. They would be utterly adorable and no cutting to worry about.

However you do it, after done spreading chocolate refrigerate until chocolate is set!

Friday, October 15, 2010

Black and White Banana Bread


It's been 10 days since posting. That's October for you! (well for me really) I love Fall. It something about Halloween that gets my bones a rattlin! This post I'm doing has ZIP to do with Halloween, but more along the lines of Fall. A deliciously moist banana bread with a chocolate rum undertone that's fantastic. It also doesn't hurt that it's so pretty. Next time I'm doubling up and making mini loaves to give out. It's one of those bread recipes that gets better with age too. I think the flavors really emerged on day two.

Black and White Banana Bread (printable)
(via Baking: From My Home to Yours by Dorie Greenspan)

Ingredients:
1 1/3 cup flour
1 teaspoon baking powder
1/2 teaspoon salt
1/4 teaspoon freshly grated nutmeg
1 1/2 ripe bananas peeled
squirt of lemon juice
grated zest of 1/2 lemon
1 tablespoon DARK rum (think good stuff!)
3 oz bittersweet chocolate finely chopped
1 stick plus 2 Tablespoons unsalted butter @ room temperature
2/3 cup (packed) light brown sugar
1/3 cup sugar
4 large eggs
1 teaspoon vanilla extract
1/2 cup whole milk

Directions:
Oven to 325 degrees Butter an 8 1/2 x 4 1/2 loaf pan dust the inside with flour and tap out excess. Place pan on an insulated cookie sheet.
Whisk the flour, baking powder, salt and nutmeg.
Mash the bananas with the lemon juice, and zest then stir in the rum. Set aside.
In your mixer, beat 8 tablespoons of butter (1stick) at medium speed until creamy about 3 minutes. Add the sugars and beat for another 2-3 minutes until light and smooth. Add eggs one at a time beating well after each. Add the vanilla. The batter will look curdled. Don’t worry.
Reduce mixer to low and add in half the flour, mix only until incorporated. With mixer running add the milk and when it’s blended, add remaining dry ingredients. Scrape down bowl and add the banana mix.
Melt your chocolate chips with your 2T butter in a microwave safe bowl and stir until smooth.
Add in a little bit less than 1/2 of your banana batter into the chocolate mixture.and stir to blend.
Drop alternating spoonfuls of batter into prepared pan and gently blend with a butter knife. Don’t over do it- 6-8 runs (zig zags) is great.
Bake for 1 hour and 20-30 minutes or until a thin knife inserted into center comes out clean. If it looks like it’s getting too brown (mine didn’t) cover with a loosely tented foil sheet. Remove when done and let cool in pan 15minutes, then remove and cool right side up on a cooling rack.
Marvel at the marble.

Tuesday, October 5, 2010

Chocolate Whoopie Pies with Salted Caramel Filling


That's a mouthful. And your mouth will be full eating these! Oh why I waited so long to try whoopie pies I'll never know! They're like little mini cakes with endless possibilities! Just delicious! The cake is the perfect platform for the caramel frosting, the frosting is sweet enough to make you mmmmm, but then you get that 'salted' flavor, and you're eating another bite, and before you know it, 1/2 your pies are gone.

Chocolate Whoopie Pies
printable
adapted from epicurious

Ingredients:
2 cups all-purpose flour
1/2 cup cocoa powder
1 1/4 teaspoons baking soda
1 teaspoon salt
1 cup well-shaken buttermilk
1 teaspoon vanilla
1 stick (1/2 cup) unsalted butter, softened
1 cup packed brown sugar
1 large egg

Directions:
Preheat oven to 350°F.
1. Whisk together flour, cocoa, baking soda, and salt in a bowl until combined. Stir together buttermilk and vanilla in a small bowl.

2. Beat together butter and brown sugar in a large bowl with an electric mixer at medium-high speed until pale and fluffy, about 3 minutes in a standing mixer or 5 minutes with a handheld, then add egg, beating until combined well. Reduce speed to low and alternately mix in flour mixture and buttermilk in batches, beginning and ending with flour, scraping down side of bowl occasionally, and mixing until smooth.

3. Spoon 1/4-cup mounds of batter about 2 inches apart onto 2 buttered large baking sheets. Bake in upper and lower thirds of oven, switching position of sheets halfway through baking, until tops are puffed and cakes spring back when touched, 11 to 13 minutes. Transfer with a metal spatula to a rack to cool completely.

Salted Caramel Frosting
printable
adapted from Chow

Ingredients:
* 1/4 cup granulated sugar
* 2 tablespoons water
* 1/4 cup heavy cream
* 1 teaspoon vanilla extract
* 12 tablespoons unsalted butter (1 1/2 sticks), at room temperature
* 1 1/2 teaspoons fleur de sel
* 2-3 cups powdered sugar

Directions:
1. Briefly stir together granulated sugar and water in a small saucepan and bring to a boil over medium-high heat. Continue cooking, without stirring, until mixture turns dark amber in color, about 6 to 7 minutes.
2. Combine salt, vanilla and heavy cream.
3. Remove from heat and slowly add in cream mixture, stirring with a wooden spoon until completely smooth. Set aside until cool to the touch, about 15 minutes.
4. Combine butter and salt in the bowl of a stand mixer fitted with the paddle attachment and beat on medium-high speed until light in color and fluffy, about 3 minutes. Reduce speed to low, add powdered sugar, and mix until completely incorporated.
5. Turn mixer off and scrape down the sides of the bowl, then add caramel. Beat frosting on medium-high speed until airy and thoroughly mixed, about 2 minutes.

Sunday, October 3, 2010

SMS: Coconut Pecan Frosting


SMS time again! I really love that I joined this awesome group of ladies! It's a great way to force myself to bake new things!! This week's pick was a Coconut Pecan Frosting. Or what I refer to as German Chocolate Frosting, that's normally what I eat this frosting with...German Chocolate cake, however I'm rather fond of brownies. And I needed a quick fix, so a box it was. And it was delicious. Mostly because of the frosting. Be sure to check out Eliana of A Chica Bakes for the recipe!

*I'm trying out this whole 'labeling' thing for photos...haven't decided if I like it or not. It's not like they're super OMG shots...but I feel like if I keep trying hard enough, someday they'll be good enough someone else will want to take credit for them, so I'd better get in practice now. HA!- More ramblings.

Saturday, October 2, 2010

WMD Chip Cookies


So, these cookies really make me wish I took better photos. Don't get me wrong, I love taking pictures, and I try, but I'm just not very good, and I'm using a point and shoot. It sounds like I'm making excuses, and to be honest, I am. But I'm hoping that by Christmas I'll have talked my husband into getting me a spankin new camera and some magic wand to wave over photos to make them rock. Maybe then I'd quit getting denied entry to certain photo food hot spots. That being said, these cookies are pretty good! In my opinion they're a mix of a brownie, a cake and a cookie. The richness of a brownie, the texture of a fudgey cake, and the shape of a cookie with the delicious chunks. I've decided to call these WMD Chip cookies because they contain white chocolate, milk chocolate and dark chocolate all in one. Hello delicious!

WMD Chip Cookies Printable
adapted from Bakers Royale

Ingredients:
4 ounces bittersweet chocolate
8 tablespoon butter, softened
2 large eggs
3/4 cup brown sugar (firmly packed)
1 teaspoon vanilla
1 cup flour
1/2 cup Dutch-process cocoa
1/2 teaspoon espresso powder
1/2 teaspoon salt
1 teaspoon baking soda
1 cups semi sweet chocolate chips
1/4 cup white chocolate chips
1/4 cup milk chocolate chips
3/4 cup toasted pecans

Directions:
Oven to 325. Line a cookie sheet with parchment paper.
Whisk together the flour, cocoa, baking soda, espresso powder and salt. Set aside .
Melt the butter and bittersweet chocolate over low heat. Remove from heat and add the vanilla.
In a separate bowl, on medium speed beat eggs and sugar until light and fluffy, about 3 minutes. Bring speed down to low and beat in the chocolate mixture until well combined.
Add the flour to the mixture and gently fold with a wooden spoon until just combined. Fold in the chocolate chips and nuts.
Drop 1-1/2 tablespoon of dough onto parchment lined cookie sheet.
Bake for 10-12 minutes.

Thursday, September 30, 2010

Preserve Crumb Bars


So I had this lovely jar of homemade preserves (go me) in the fridge that required some more use. I mean this stuff was awesome on all sorts of bread, biscuits and toast and...well for some reason that's all I could think to do with it. Luckily I wonder around blog land a lot, and came upon a recipe that would allow me to use these delicious homemade preserves before I sat down with a spoon.


Preserve Crumb Bars
Printable
via Effort to Deliciousness

Ingredients:
1 1/2 stick of butter (or 12T if that helps you any)
1 c pecans, chopped and TOASTED
1 1/2 c flour
1 1/4 c old fashioned rolled oats
1/2 c sugar
1/3 c brown sugar
1 t salt
1/2 t baking soda
1 cup preserves (I used the homemade plum raspberry preserves)


Directions:
Oven to 350.

In a small sauce pan, melt the butter. Remove from heat and continue on.
In you mixer bowl, mix flour, oats, sugars, salt and baking soda. Pour in melted butter, and mix until combined. It’ll look dry and chunky. Don’t worry, it forms nice when pressed into your parchment lined 8x8. Transfer 2/3 of the dough into the pan and press firmly and evenly. Spoon on 1c of preserves and top with remaining dough. Press again (lightly). Bake 45 minutes (rotating 1/2 way of course) and cool on a wire rack before slicing and storing in an airtight container for 1 week.

Easy Peasy.

Saturday, September 25, 2010

SMS: Plum Raspberry Preserves


Whew! SMS, I'm back! I feel like I'm starting to get things rolling again! I'm glad I went in this week and decided to give canning a try. I've never canned anything before and to be honest I thought that it'd be a hard, tedious task. I was wrong! The amount I made wasn't at all tedious. It seemed to be just right. I was just starting to get bored peeling plums when I finished up! The possibilities are endless for the preserves! Be sure to visit our host this week and nab the recipe: Effort to Deliciousness thanks for a great pick Margot!

Friday, September 24, 2010

Chocolate Cupcakes with Peanut Butter Frosting


I have had one of those weeks. I've spent a decent amount of time in the kitchen only to have my brain spend said amount of time OUT of the kitchen. I have no clue what my deal is. I was talking with some of the soccer mom's over practice, and we've decided that once you have a kid you start to lose some of 'it'. Then when you have another child, you lose the majority of 'it'. It being whatever you covet most. In my case my body had gone south and my brain followed suit (just at a slower process). I'm working on getting said body back, but my brain doesn't seem to be following suit as well.

On to baking.

I recently joined up with Taste And Create, lets face it, anything to get out there a bit more is great. The deal with Taste and Create is pretty simple. You sign up by a set date, then you're paired up with another blog. You create something from the new blog and well, blog about it. I was paired up with: Not So Unique Ideas. From her blog I was inspired by the Chocolate Cupcakes with Peanut Butter frosting. I didn't use her cupcake recipe as I had one that my girlfriend gave me MONTHS ago and I've been meaning to get on it, but before I goofed on the frosting, it was divine. Nothing like peanut butter!

Chocolate Cupcakes with Peanut Butter Frosting Printable
Adapted from: adashofsass.com via Sour Cream Chocolate Cake Sky High Cakes
For the cake:
2 cups all-purpose flour
2 1/2 cups sugar
3/4 cup unsweetened cocoa powder
2 teaspoons baking soda
1 teaspoon salt
1 cup vegetable oil
1 cup sour cream
1 1/2 cups strong coffee
2 tablespoons distilled white vinegar
1 teaspoon vanilla extract
2 eggs
1 tablespoon espresso powder (optional)

- Preheat the oven to 350 degrees. Grease and flour two regular-sized muffin trays or line with cupcake liners.
- In a large bowl, sift together the flour, sugar, cocoa powder, baking soda and salt.
- Add the sour cream and oil. Stir until combined.
- Slowly add the coffee and stir to combine. Blend in the vanilla and vinegar.
- Scrape down the sides of the bowl. Add the eggs, one at a time. Mix until completely combined.
- Pour into prepared muffin tins. Fill each tin about 2/3 of the way full.
- Bake for 23-25 minutes or until a toothpick inserted in the middle comes out clean.
- Remove the cupcakes to a wire rack to cool. Let cool completely before frosting.

Peanut Butter Frosting
(via Not So Unique Ideas originated from Barefoot Contessa)

* 1 cup confectioners' sugar
* 1 cup creamy peanut butter
* 5 tablespoons unsalted butter, at room temperature
* 3/4 teaspoon pure vanilla extract
* 1/4 teaspoon kosher salt
* 1/3 cup heavy cream

Place the confectioners' sugar, peanut butter, butter, vanilla, and salt in the bowl of an electric mixer fitted with a paddle attachment. Mix on medium-low speed until creamy, scraping down the bowl with a rubber spatula as you work. Add the cream and beat on high speed until the mixture is light and smooth.

Wednesday, September 22, 2010

Baked Doughnuts


Apparently I'm on a doughnut kick. See my doughnut muffin post for the many reason's why doughnuts rule. These are MORE along the lines of what I was looking for in a doughnut. They are not however THE doughnut. I'm sure I'm not going to be able to grasp THE doughnut without breaking out the pan and oil to fry. I have made delish yeast fried doughnuts and now that I'm thinking of them...I might have to embark on that journey again soon. It's a crazy mess, utterly fantastic, and so worth it. That being said after last Sunday's obsession I had with eating so much my stomach hurt, I should rethink yeast doughnuts until I can drop off the 4lbs I put on.

Baked Doughnuts with Chocolate Glaze
Printable
Adapted from King Arthur Flour and Alton Brown

Baked Doughnuts:
* 3/4 cup AP flour
* 1/4 cup cake flour
* 1/2 cup sugar
* 1 teaspoon baking powder
* 1/8 teaspoon nutmeg
* 1/4 teaspoon salt
* 1 teaspoon cinnamon
* 2 tablespoons buttermilk
* 2 large eggs
* 3 tablespoons vegetable oil

Directions:
Gotta love the simplicity. Super easy.
Oven to 375.
Mix dry ingredients together.
Wisk the wet ingredients together until foamy.
Dump wet into dry and mix just until combined.
Spray a 6 spot doughnut plan or a 12 mini spot doughnut pan liberally with cooking spray. Fill the forms 1/2 way full.
Bake at 375 for 10-12 minutes until tops are dark golden brown and springs back when lightly touched.
Remove from oven and then the pan and let cool on rack until ready to glaze.

Chocolate Glaze
* 1/2 cup unsalted butter
* 1/4 cup whole milk, warmed
* 1 tablespoon light corn syrup
* 2 teaspoons vanilla extract
* 4 ounces bittersweet chocolate, chopped
* 2 cups confectioners' sugar, sifted

Combine butter, milk, corn syrup, and vanilla in medium saucepan and heat over medium heat until butter is melted. Decrease the heat to low, add the chocolate, and whisk until melted. Turn off heat, add the powdered sugar, and whisk until smooth. Place the mixture over a bowl of warm water and dip the doughnuts immediately. Allow glaze to set for 30 minutes before serving.

Sunday, September 12, 2010

Browned Butter Chocolate Chip Cookies


I've heard a lot lately in blog land of Browned Butter. I'll admit curiosity had gotten the best of me and I'm glad it did. Taking the extra step of browning the butter seemed to really give these cookies a delicious caramelly (yes I might have just made that up) undertone. The addition of the TOASTED (I'm a firm believer that toasting nuts is a must) pecans and the gooey chocolate chips...they made for some good cookies! My waistline was relived when my husband took them into work and come back with an empty container.


Browned Butter Chocolate Chip Cookies
Printable Recipe
(Adapted from Family Friends and Food via Cooks Illustrated)

Ingredients
1 3/4c all-purpose flour
1/2t baking soda
14T unsalted butter (1 3/4 sticks)
1/2c granulated sugar
3/4c packed dark brown sugar
1t salt
2t vanilla extract
1 large egg
1 large egg yolk
1 1/4 cups semisweet chocolate chips or chunks
3/4 cup chopped pecans ,toasted!

Directions
Oven to 375. Line 2 large baking sheets with parchment paper. Whisk flour and baking soda together in medium bowl; set aside.

Heat 10 tablespoons butter in skillet over medium-high heat until melted, about 2 minutes. Continue cooking, swirling pan constantly until butter is dark golden brown and has nutty aroma, 1-3 minutes. Remove skillet from heat and, put in your mixer. Add the remaining butter and keep stirring until the new butter is melted.

Add both sugars, salt and vanilla to bowl with butter and mix until fully incorporated. Add egg and yolk and whisk until mixture is smooth with no sugar lumps remaining, about 30 seconds. Let mixture stand for 3 minutes, then whisk for 30 seconds. Repeat process of resting and whisking 2 more times until mixture is thick, smooth and shiny. (I did do this as stated, gave me time to clean up the mess between whisking) Using rubber spatula or wooden spoon, stir in flour mixture until just combined, about 1 minute. Stir in chocolate chips and nuts , stir once more to make sure no flour pockets remain.

Drop by cookie scoop full onto a baking sheet.

Bake cookies 1 tray at a time until cookies are golden brown and still puffy, and edges have begun to set but centers are still soft, 10-14 minutes.

Friday, September 10, 2010

Doughnut Muffins


I LOVE doughnuts. Really love them. I'm one of those weird ones (or so I hear) that likes the doughnut after it's been cooled off. I don't like them fresh from the fryer. Give me a cooled doughnut anytime. And let me be to enjoy the treat.

I have a favorite doughnut shop. In Kansas City it's any LaMars. Oh delish. They have the best german chocolate knot ever! And their glazed yeast, knocks krispy crap out of the water. In Iowa where my husband is from, there's a doughnut shop not terribly far from where my Mother in Law lives, every time we'd come in the morning there would be my pull apart cinnamon nut bread. (it has the doughnut glaze on it, so I'm using it) Their doughnut holes rocked as well! My sister in law was smart enough to get her own bag of those! I've yet to find a doughnut place here in Ohio, so I substituted. Loosely. These were good, however they are not to be mistaken for doughnuts. Just really good, tasty muffins.


Doughnut Muffins Printable Recipe

(I got it from How to Simplify, who in turn got it from King Arthur Flour)
Batter:
* 1/4 cup butter
* 1/4 cup vegetable oil
* 1/2 cup granulated sugar
* 1/3 cup brown sugar
* 2 large eggs
* 1 1/2 teaspoons baking powder
* 1/4 teaspoon baking soda
* 1 to 1 1/4 teaspoons ground nutmeg, to taste (I used 3/4t)
* 3/4 teaspoon salt
* 1 teaspoon vanilla extract
* 2 2/3 cups flour
Glaze:
*1c powdered sugar
*1/2t vanilla
*1-2t milk till good dipping consistency
Directions:

1) Preheat the oven to 425°F. Lightly grease a standard muffin tin. Or line with 12 paper or silicone muffin cups, and grease the cups with non-stick vegetable oil spray; this will ensure that they peel off the muffins nicely.

2) In a medium-sized mixing bowl, cream together the butter, vegetable oil, and sugars till smooth.

3) Add the eggs, beating to combine.

4) Stir in the baking powder, baking soda, nutmeg, salt, and vanilla.

5) Stir the flour into the butter mixture alternately with the milk, beginning and ending with the flour and making sure everything is thoroughly combined.

6) Spoon the batter evenly into the prepared pan, filling the cups nearly full.

7) Bake the muffins for 15 to 17 minutes, or until they're a pale golden brown and a cake tester inserted into the middle of one of the center muffins comes out clean.

8) Remove them from the oven, and let them cool for a couple of minutes, or until you can handle them.

9) After cooled, mix your glaze and dip. Double dip, triple dip if you must. It's one of my favorite parts.

Yield: 12 muffins (on the dot- no left over batter)

Thursday, September 2, 2010

The Pioneer Woman- and her awesomeness.


So, out of all blog land, I have a favorite.

The Pioneer Woman- Ree Drummond. That woman is fantastically amazing. Not only do her recipes inspire me to get my butt moving towards the kitchen, she doesn't stop there. Take a minute and read about the rest of her life! She's got it going on! I'm not going to divulge how, if she weren't so many miles away, I'd worship the ground she walked on, or that I'd happily do her dishes after a cooking stint, just to eat her meals. I just won't reveal myself like that. So, after oogling some of her most famous recipes I made 2, in one day.

Sadly, I forgot to photo of the Cinnamon Rolls before they walked their way out the door to Kevin and Chrissy's tummy, my husbands job, or my neighbors front door! I managed to wrangle a pan for the house- and my husband happily declared they still taste awesome on day two.

Then, there's the chocolate sheet cake. Which after describing what it was to my sister in law (Chrissy) she declared it Texas Sheet Cake and that we HAD to make it. So of course, I did. It'd been on my list for almost 2 years. Let me tell you, I'm sad and happy I waited that long to make it. First off, it's astounding. And if I'd have known it was that good so long ago, I'd be 20 lbs heavier. I can't sing high enough praises of the awesome simplicity that turns out so delectable. I ate way more than I should and promptly sent a large portion home with Chrissy- while keeping a more respectable size here for me. Confession, I ate some for breakfast, and predict the rest will be gone before dinner. I have to make it hold until dinner- having it gone before lunch would show NO willpower.

Now that I sound like a cyber stalker- I'm going to post you the recipe and highly encourage you to read Ree everyday like your life depends on it.

Chocolate Sheet Cake -The Pioneer Woman- Ree Drummond

Cake:
2c flour
2c sugar
1/4t salt
4 HEAPING T cocoa powder(I used double dutch- awesome!)
2 sticks of butter
1c boiling water
1/2c buttermilk
2 eggs, beaten
1t baking soda


Icing:
1/2c chopped pecans
1 3/4 sticks butter
4 HEAPING T cocoa powder (double dutch again)
6T milk
1t vanilla
1lb (minus 1/2c- it works) powdered sugar

Directions:
Oven to 350. I spray the 1/2 sheet pan with pam- just cause.
In saucepan, melt butter, add cocoa stir to combine. In a separate bowl, combine flour, sugar, salt and stir to combine. When butter and cocoa are melted together- pour over top of the flour mixture. Stir a bit to cool. Then gather up your eggs- beat them, and add them to 1/2c buttermilk. Toss in your baking soda and vanilla. Add to the butter/flour mixture you've already go going. Stir to combine and pour that lusciousness into your sheet pan. Bake for 20minutes.

While your cake baking whip up the icing. Simple. Melt butter and cocoa together in saucepan. Turn off once it's combined, pour into your mixing bowl and let hang for a minute. Gather up your powdered sugar and milk and vanilla. Start the mixer and slowly add the powdered sugar, dump in the milk and vanilla, continue to to mix until combined. This is tasty business.

Once your cake is done, pull it out of the oven, give your icing another stir and pour on top. Spread around if you must. If you have any sorts of willpower- wait until not scalding to eat it. It's delicious.

Then go over to the Pioneer Woman's website and profess your love for her as well.


Don't judge this recipe by this photo- I'm in need of a way better camera and some schooling on how to photo food better. I'm working on it.

Monday, August 30, 2010

Oreo Cupcakes!


Sound the alarm! I'm posting! It's been a wild ride, and I'm still hanging on! We're moved, -kinda- unpacked, and slowly getting into the swing of things! The first room I unpacked was the kitchen, and I wouldn't have gotten that far if it wasn't for my awesome sister in law- thank you so much Chrissy for your help, you're awesome!

So I bring you one of a kagillion recipes I saved while staying with family over the past 3 months. Oreo Cupcakes. I saw these on Beantown Baker and they reminded me how much I love, love Oreos, yet haven't indulged in a while. And I had a coupon for Oreos- I figured it was a sign.

These were good. I am a HUGE fan of cream cheese frosting, so that was an insta winner for me. And I love the idea of the Oreo in the bottom (I didn't photo that, I'm still trying to find the best time of day for light here- it's weird) the chunks of Oreo in the cupcake- a good thing. And I couldn't resist the mini one on top. Utter cuteness.

Oreo Cupcakes by: Beantown Baker

Oreo Cupcakes (makes 24)

1 stick unsalted butter, at room temperature
1 cup milk
2 tsp vanilla extract
2 1/4 cups flour, plus 2 Tbsp for the Oreo chunks
1 tsp baking powder
1/2 tsp salt
1 2/3 cup sugar
3 large egg whites, at room temperature
1 pkg Oreo Cookies (~45 cookies)

Preheat over to 350F. Insert liners into a medium cupcake pan.

Twist apart 24 Oreos. Place the wafer with filling on it, filling side up, in the bottom of each paper liner. Save the tops to crush for later.

Cut the remaining Oreo cookies into quarters with a sharp knife. Toss with 2 Tbsp flour and set aside.

In a large bowl cream the butter until fluffy, about 3-5 minutes. Add the milk and vanilla and mix to combine (as well as you can)

In a separate bowl mix together the flour, baking powder, and salt.

Add the dry ingredients to butter mixture. Mix until integrated. Stir in sugar. With an electric mixer on low speed, beat for 30 seconds. Turn the mixer up to medium speed and beat for 2 minutes. Add the egg whites. Beat for 2 more minutes. Stir in the quartered cookies.

Fill the cupcake lines three-quarters full. Bake for about 20 minutes or until a toothpick inserted in the center of cupcakes comes out clean. Cool cupcakes in the pan.

Frosting

8 oz cream cheese at room temp
1 stick butter at room temp
1 Tbsp vanilla extract
3-4 cups powdered sugar

Cream butter and cream cheese until fluffy.

Add vanilla extract. Slowly add powdered sugar until desired consistency is reached.

Assemble the cupcakes
Once cupcakes have cooled completely, frost with cream cheese frosting. Sprinkle with crushed Oreos and place an utterly adorable mini Oreo on top. Better yet- dip the mini Oreo in chocolate, let set and then place on top. Sinful.